
Using Actions from Photoshop Actions Panel
Let’s load one of the Sets into the Actions Panel and have a play with some of the Actions.
- Open an image into Photoshop;
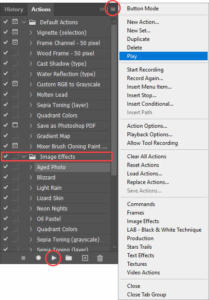
- Click on the fly-out menu icon at the top-right of the Actions Panel;
- Scroll down the fly-out menu to the section that contains the additional Actions;
- Choose Image Effects from the list of Action Sets;
- Image Effects will be added to the Actions Panel. If you do not see the list of Actions in the Set, click on the disclosure triangle to the left of the Set icon;
- Click on Aged Photo to highlight the Action;
- Click on the Play button icon at the bottom of the Actions Panel. Clicking on the Play button will tell Photoshop to play all the steps of the Action;
- When the Action is finished, you will see the result on the open image.
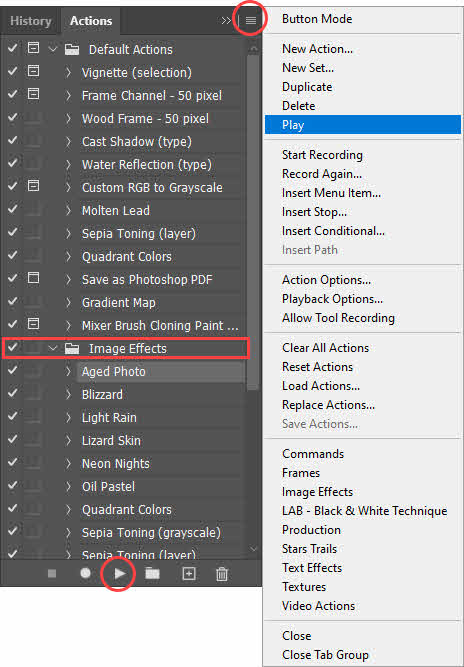
You can also play any Action by selecting Play from the Action Panel fly-out menu.
Apply a different Action
If you do not like the effect an Action has had on your image, and you want to apply a different Action, you need to remember that Photoshop Actions will add on top of each other. To illustrate this on the image that is still open and with the Aged Photo Action applied:
- Open the Image Effects Action Set;
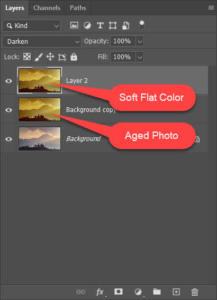
- Click on Soft Focus and click on the Play button;
- You’ll now see the extra Layer created by this additional Soft Flat Color Action.

Often, this is not the result you want. More often, you wish to revert the image to its original state before trying a new Action. To return the image to its original state, press F12 or select File > Revert. Or delete the new layer(s) created by the Action. Now that you have the file back to its original state, try a different Action:
- Press F12 or select File > Revert;
- Click on Sepia in the Actions Panel;
- Click the Play button at the bottom of the Actions Panel.
See the steps of an Action
If you want to see all the steps that make up a particular action, you can click on the disclosure triangle to the left of the specific Action. To see all the steps in an Action:
- Click on the Action to highlight it;
- Click on the disclosure triangle to the left of the Action name;
- This will expand the Action and show you the individual steps;
- Click on the exposure triangle next to any of the steps to see the different instructions contained in that step.


Playing Photoshop Actions that include a Stop command
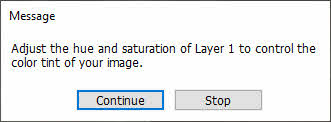
Many Photoshop Actions contain a Stop command. This Stop command will pause the Action and allow the user to provide some information before allowing the Action to proceed. For example, an Action may contain the crop command. Since each image is different, the Action can’t know where to apply the crop. With this difficulty in mind, the creator of the Action will add a Stop command to allow input from the user. Let’s look at one such Action:
- With an image open and the Actions panel open, click on the fly-out menu icon;
- Select LAB – Black & White Technique from the list of Action Sets;
- In the Actions panel, click on the disclosure triangle to open the LAB – Black & White Technique set;
- You will notice there is only one Action in the set. Click on it and click on the Play button at the bottom of the Actions Panel;
- A message box will open. You now have the choice of stopping the Action or continuing once you have read the instructions. Click Continue;

- The Hue/Saturation dialogue opens for you to make adjustments;
- Adjust the settings and click OK when you’re happy with the look;
- The Action continues to its completion.


ornwall
Peter Downes ornwall? Do you mean Cornwall?