

As some point, you are going to need to upgrade your computer or your hard drive. You may be at that stage already, but the thought of moving Lightroom Classic to a new computer is filling you with dread. Well, it need not be that scary. Follow this guide, and you will be up and running on your new computer as if nothing had changed.
The FREE download version of this guide has more detailed information.
What you should know before beginning
You will need to know your way around your computer and its filing system. If you are on a Mac, you should be familiar with the Finder and the files’ structure. If you have a Windows computer, you will need to know how to use and navigate the file Explorer.
Things you will need before beginning.
You do not need much but making sure you have these few things to hand before you start, will make the process easier. Regardless of what type of move you are performing, you will need to know your Adobe ID and password for signing in to Lightroom Classic on your new computer. You may also need your account details and passwords for any third-party plugins you may use.
If you are replacing your computer, I would recommend that you keep your existing computer intact. The idea here is to eventually have both your current and new computer up and working before deleting what will become your old computer.
Here is what you will need before beginning the move: –
- Existing computer fully working;
- New computer fully set up and working. You do not need Lightroom installed at this stage;
- An external storage device large enough to hold all your photographs and additional Catalog related files;
- Your account details and passwords for all third-party plugins.
 Lightroom CC (the cloud version)
If you use Lightroom (the cloud-based version), then all your images are stored on the Adobe cloud, and all you need to do is instal Lightroom on your new computer. Lightroom will do the rest for you.
What not to do
Rely on a comfortable and uncomplicated solution offered up by someone on a chat forum. The method I am describing here may seem protracted, but it is the safest method. Do not: –
Import your photographs into your new copy of Lightroom Classic.
It may sound logical to copy all your photographs over to your new computer and import them into your new copy of Lightroom Classic. This is the worst thing you could do. The pictures will import as new image files into the new Lightroom Classic Catalog, and you will lose all your metadata and edits. Years of work will be lost.
Save the metadata to XMP files.
This solution is often mentioned because it saves all your edits. However, it does not save other metadata such as: –
- Flags;
- Stars;
- Collections;
- Virtual copies;
- Stacking information;
- Develop history;
- Other information.
Use the Synchronize Folder command.
All this will do is bring in “Missing” photographs to the new Catalog. This option may sound useful and easy, but the missing pictures are imported into the Catalog as brand-new files. They will not have any existing edits or Develop history. Using the Synchronize Folder option is like importing new photographs.
Export as Catalog
To coin a phrase, this is the least bad option. Invoking the menu option File > Export as Catalog will create a copy of the photographs and their edits and metadata. But the Export as Catalog does not copy any presets, plugins, publish services or sync information.
The proper and safe way to move Lightroom Classic to a new computer
Now that I have persuaded you not to follow any of the commonly suggested methods, let’s do this properly.
Preparation
Proper preparation is the key to moving Lightroom Classic and your photographs to a new computer. The method described here is the same for transferring between computers regardless of operating systems. The Lightroom Classic Catalog is cross-platform compatible, making it possible to open any Lightroom Classic Catalog in either Mac OS or Windows.
Find all missing folders and images.
This is a lot easier than you may initially imagine. To locate all the missing folders and images, ensure you are in the Library panel and select Library > Find All Missing Photos
This will group all the missing images into a temporary Collection inside the Catalog panel. The process of relinking missing folders and images is now a lot easier. It should be tackled logically. Start with relinking drives before relinking folders and finally individual images.
Relinking missing drives
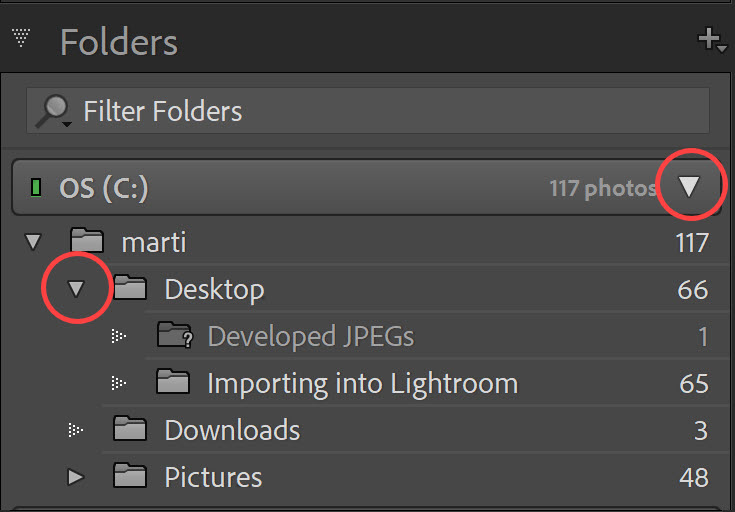
 If the drive is missing, Lightroom Classic will display the drive with dulled text. The drive letter and name will still be displayed in the Library Module’s Folders panel, but the small green light will be missing, and the text will be greyed out.
You have two courses of action to relink a missing drive: –
- Reconnect the drive to your computer, or;
- Ensure the drive has not changed its name or drive letter.
The first option is the easiest to fix; ensure it is connected to your computer and that the drive has power. The second option is a bit more involved and is dependent on whether you have a Mac or a Windows computer. Download my free guide for full instructions on relinking missing drives.
Relinking missing folders
 After relinking missing drives, you can now move on to relinking folders. Once you relink a folder, Lightroom will automatically relink all the subfolders and images contained within the folder. This automatic relinking behaviour is why it is more efficient to relink folders before relinking individual photographs.
To find missing folders: –
- Open the Folders panel in the Library Module;
- Missing folders are identified by a small question mark (?) symbol. Also, the folder name and the folder icon are a dimmed shade of grey.
You can right-click on a folder and select Find Missing Folder and navigate the folder’s location on your computer. If this folder is a parent folder, the subfolders will automatically be relinked provided none of the names and hierarchy has changed. Relinking to a parent folder can be a huge time saver when relinking missing folders.
However, suppose the missing folder is not a parent folder. In that case, you will need to repeat the above process for each missing folder.
Relinking missing photographs
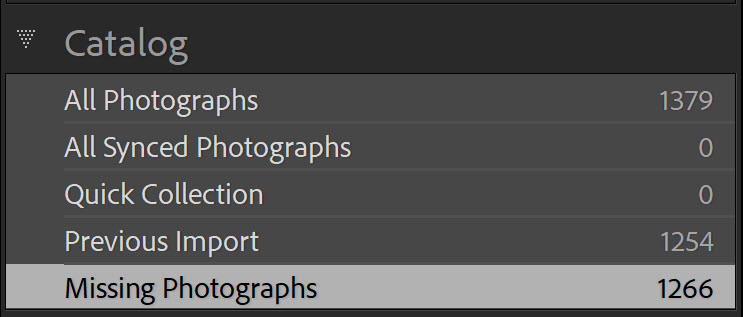 After completing the steps above for relinking missing drives and folders, rerun the Find Missing Photos command. Select Library > Find All Missing Photos. After relinking all the folders, Rerunning this command will update the temporary Collection in the Catalog panel and show you if you have any missing individual photos.
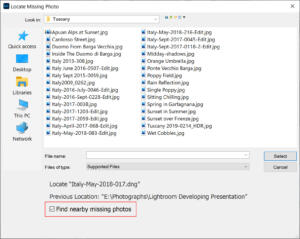
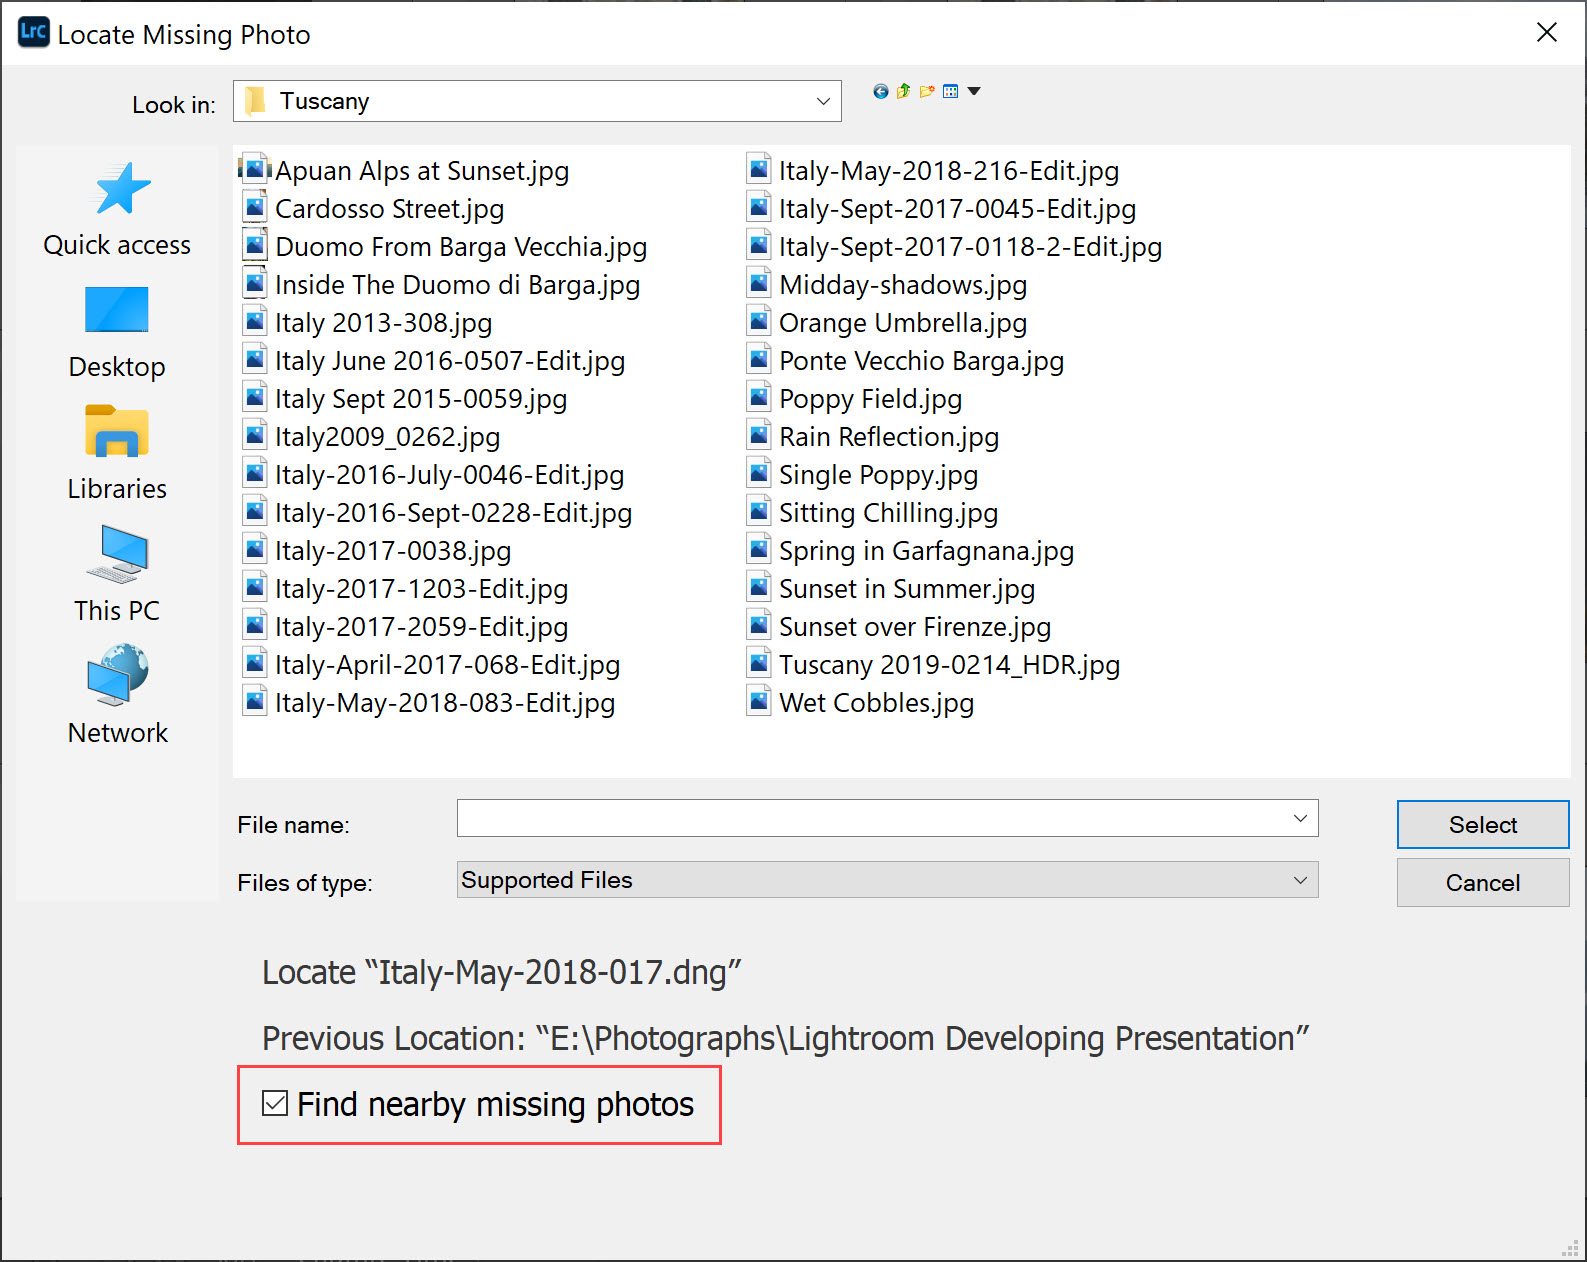
To relink a missing photo: –
- Click on the Photo Is Missing icon on the image thumbnail or in the Histogram panel;
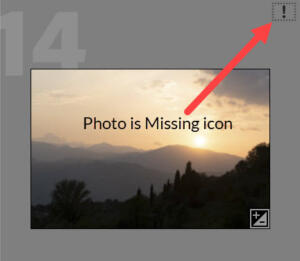
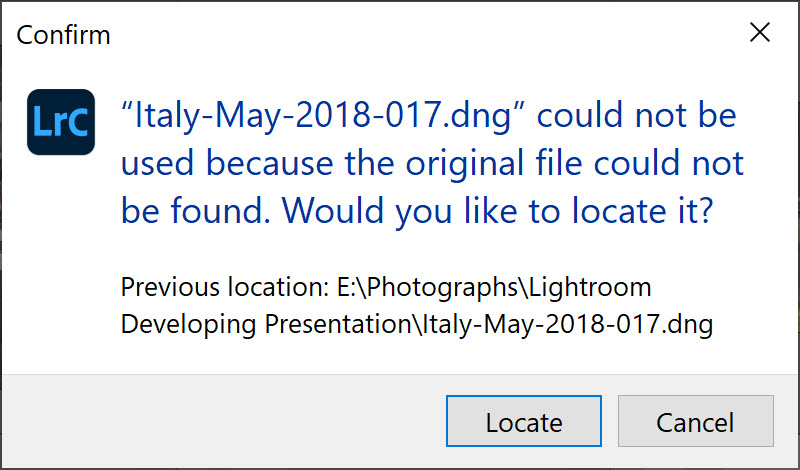
- A dialogue box will open to show you the last known location of the image file. Click on the Locate button;
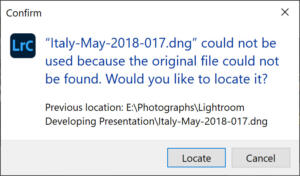
- Navigate to where the photograph is now stored;
- It is always useful to turn on the Find Nearby Missing Photos check box in the Locate dialogue window. This feature will tell Lightroom Classic to search for and relink all missing images in this folder.
- Run the Library > Find All Missing Photos command again;
- Repeat.
Create a backup of the Catalog
Lightroom allows you to regularly create a backup of the Catalog and associated files. No doubt you have seen the Lightroom prompt when you exit Lightroom. Even if you regularly create backups of the Catalog, it is worth making a fresh backup before moving Lightroom Classic to a new computer or drive. You can manually create a backup at any time.
Note: Backups that you create from Lightroom will only create a backup of your Catalog files. It will not make a backup of your images.
To manually create a backup: –
- Choose Edit > Catalog Settings (Windows) or Lightroom > Catalog Settings (Mac OS);
- Choose Back Up Catalog > When Lightroom Next Exits;
- Close Lightroom to begin the backup process.
To see the location where Lightroom stores the backups of the Catalog, click on Show to the right of the location information in the Catalog Setting dialogue. 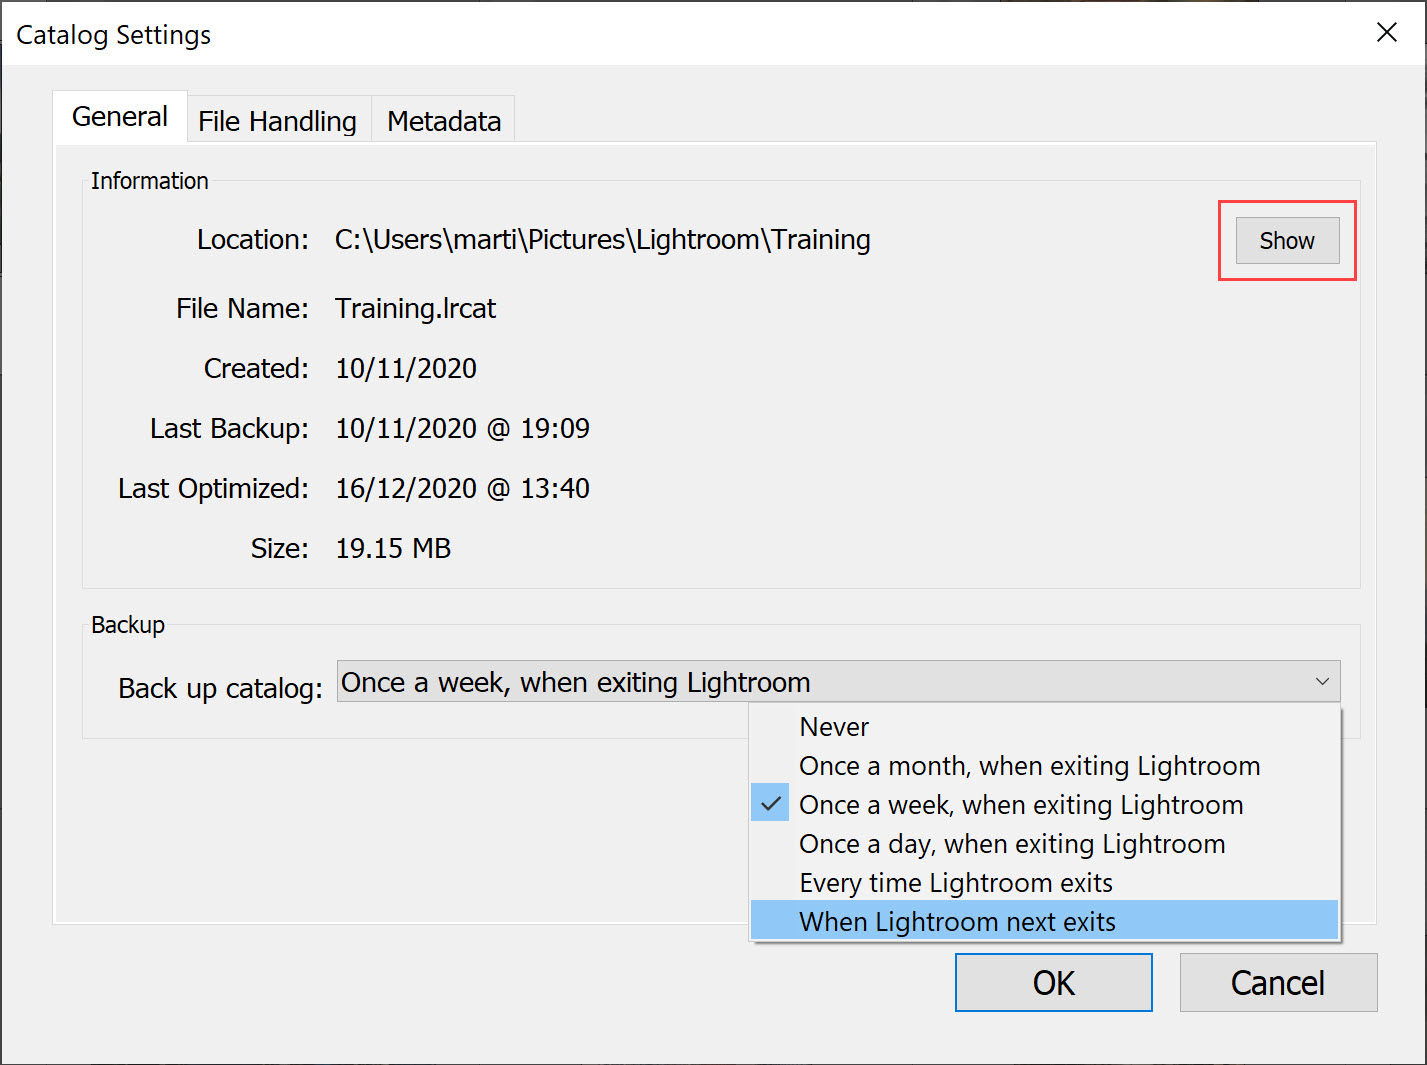 Make a note of this location.
Copying
With all the preparation work completed, it is now time to begin making a copy of all the files you will need to move Lightroom to a new computer. I recommend you use an external drive to copy all these files onto.
Copy your photographs
You can use the operating system to create a copy of all your photographs. If you followed the steps to tidy your folder structure, you would now have all your folders nested under one parent folder. It is a simple task to copy this single parent folder onto the external drive. The computer’s operating system will automatically copy all the subfolders. If you have more than one parent folder, repeat the copy task for each parent folders.
Depending on how many images you have, and the collective size of the image files, this copying process may take a while—a good time for a cup of coffee.
Copying these files is next on the list.
Copy the Catalog
Navigate to the folder on your computer where the Catalog is stored. By default, Lightroom stores the Catalog in these folders: –
- Windows: \Users\[user name]\Pictures\Lightroom\Lightroom Catalog.lrcat
- Mac OS: /Users/[user name]/Pictures/Lightroom\Lightroom Catalog.lrcat
If you store the Catalog in a different location, you can locate it by: –
- Choose Edit > Catalog Settings (Windows) or Lightroom > Catalog Settings (Mac OS);
- Click on the Show button to the right of the location information in this Catalog Setting
![]() Your computer’s operating system will open to the location of the Catalog. The Catalog file has the extension lrcat after its name. You will also see other Catalog associated files and folders in this location. You should copy all the files and folders found in this Catalog folder.
Your computer’s operating system will open to the location of the Catalog. The Catalog file has the extension lrcat after its name. You will also see other Catalog associated files and folders in this location. You should copy all the files and folders found in this Catalog folder.
These associated files and folders will include: –
- Backups folder;
- [Cataog name].lrcat-wal;
- [Cataog name] Helper.lrdata
- [Cataog name] Previews.lrdata;
- [Cataog name].lrcat – this is the actual Catalog file.
Copy all these files and folders. Strictly speaking, your new copy of Lightroom does not require them all, but it is safer and simpler to copy the lot of them. In the operating system, it may be simpler and safer to select the parent Lightroom folder and copy it. This will ensure you also copy all the associated files and folders.
Copying Presets, Templates and Plugins
If you have created or installed your own presets (of any kind), templates or plugins, you will need to make copies of them. However, if you have never created or installed presets, templates or plugins, you can skip this section.
By default, the folders can be found by navigating to these locations: –
- Windows: \Users\[user name]\AppData\Roaming\Adobe\Lightoom
- Mac OS: /Users/[user name]/Library/Application Support/Adobe/Lightroom
- Windows: \Users\[user name]\AppData\Roaming\Adobe\CameraRaw
- Mac OS: /Users/[user name]/Library/Application Support/Adobe/CameraRaw
Alternatively, you can also use Lightroom to display the location of the relevant folders – even if they are not in the default locations. To find the location of the relevant folders: –
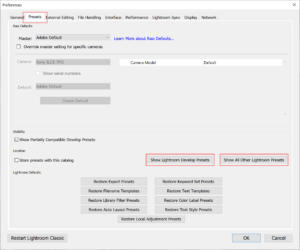
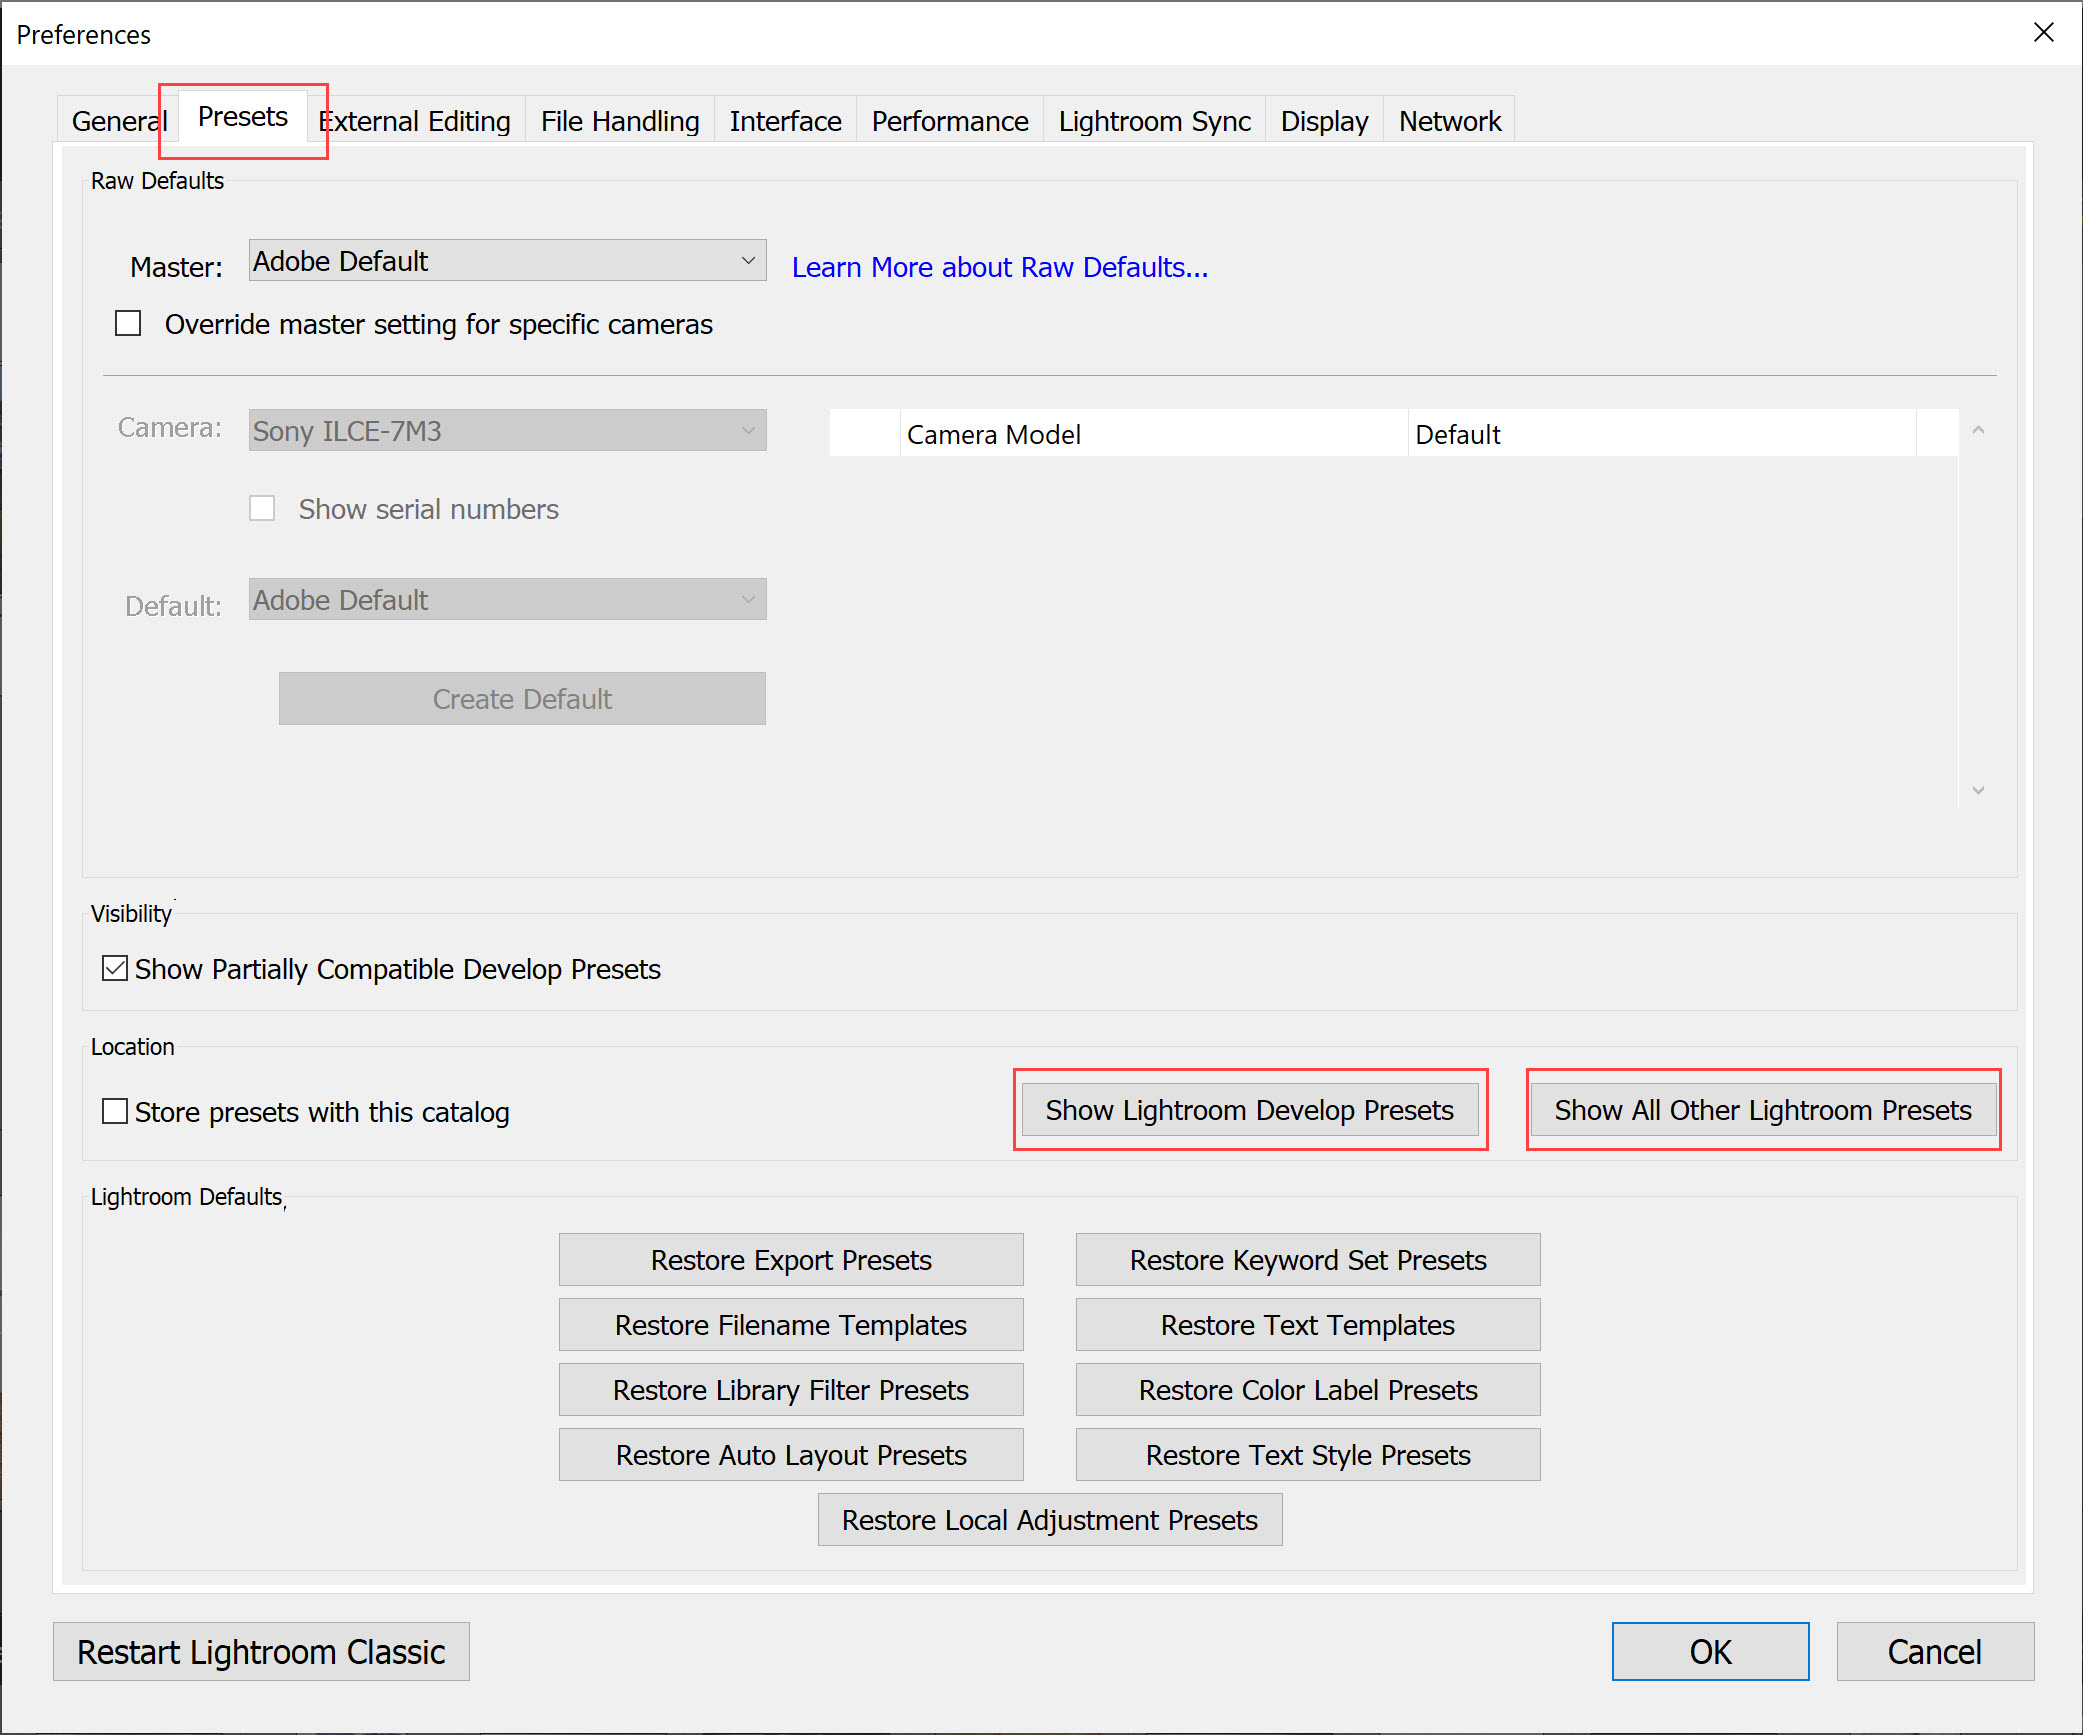
- Choose Edit > Preferences (Windows) or Lightroom > Preferences (Mac OS);
- Along the top of the Preferences dialogue, select the Presets tab;
- Click on the Show Lightroom Develop Presets button to reveal the location in your operating system. Copy this folder;
- Repeat step 3 for the Show All Other Lightroom Presets button and copy the folder.
It may be worth noting these folder locations or referring to this part of the guide when you come to relinking your Catalog on the new computer.
If you use third-party plugins, you should note them and ensure you know your user details, passwords, and activation codes. Visit the website for each vendor of your third-party plugins to refresh your knowledge of account details. Download a fresh copy of each plugin you intend to use.
Example third-party plugins include: –
There are a plethora of third-party plugins available for Lightroom Classic. The list above is a small list of the most popular.
Copying Mobile photos
If you use the Lightroom Mobile app on your smartphone, all the photographs you take, edit or add to this app are synced back to Lightroom Classic Catalog. Lightroom stores them in a dedicated folder that will be displayed as a separate drive inside the Library module’s Folders panel.
This folder is located at: –
- Windows: \Users\[user name]\My Pictures\Lightroom\Mobile Downloads.lrdata
- Mac OS: /Users/[user name]/Pictures/Lightroom/Mobile Downloads.lrdata
When you install your new copy of Lightroom on your new computer or drive, it can be tricky to recreate these synced photographs. The best option is to copy them and add them to a new folder in your new installation.
On your new computer
Now that you have a copy of all the necessary folders, files and images, you can install a fresh copy of Lightroom on your new computer.
Install Lightroom on the new computer
Before installing Lightroom Classic on your new computer, you first need to install the Adobe Creative Cloud application. To download the application, visit https://creativecloud.adobe.com/ Once downloaded and installed, you will need to log in to your Adobe account to access the applications available with your subscription.
![]() To install Lightroom Classic: –
To install Lightroom Classic: –
- In the Creative Cloud application click on the Apps tab at the top left;
- Scroll down until you find Lightroom Classic. Do not confuse this with Lightroom CC which is the cloud-based application;
- Click on the Install button associated with Lightroom Classic.
Open the Catalog on your new computer
Now comes the fun part – hopefully. With the new computer running a fresh install of Lightroom Classic, you can now launch the Catalog you copied from your old computer. But do not launch Lightroom Classic just yet.
Before you open your new version of Lightroom Classic with the copied Catalog: –
- Open the operating system’s file browser on your new computer;
- Navigate to the drive and location where you copied the Catalog file to;
- Copy the Catalog file and the accompanying folders and files into a folder on your new computer. If you wish, you can copy them back to the same location, which by default is
- Windows: \Users\[user name]\Pictures\Lightroom\Lightroom Catalog.lrcat
- Mac OS: /Users/[user name]/Pictures/Lightroom\Lightroom Catalog.lrcat
- Copy the folder(s) that contain your photographs. If you structured them into one parent folder, copy that single folder and all the subfolders will also be copied;
- Place the copied folder(s) of photographs to your preferred location on your new computer, or leave them on the external drive if this will be your new way of working;
- After copying the folders and Catalog over to the new computer, double-click on the Lightroom Catalog.lrcat file;
- Lightroom will launch and open this Catalog.
Do not panic if you see question marks on some or all your folders in the Folders panel of the Library module. This is expected, and the preparation you did beforehand will now pay off.
Relink missing folders
This is where having one parent folder that contains all your images comes in handy. If your photographs were previously stored on the external drive, you might not see any question marks. If you have no question marks on any of your folders, you can skip this step.
To relink missing folders: –
- Find the parent folder in the Folders panel;
- Right-click on this parent folder and choose Find Missing Folder;
- Navigate to and select the same parent folder in its new location on your new computer;
- Lightroom will relink this parent folder and all the subfolders.
Repeat the steps above if you have more than one parent folder or any other folders with a question mark.
Update the Preferences
Copy the preferences files to your new computer and everything should work as before. Remember the location to copy the preferences to is: –
- Windows: \Users\[user name]\AppData\Roaming\Adobe\Lightoom
- Mac OS: /Users/[user name]/Library/Application Support/Adobe/Lightroom
- Windows: \Users\[user name]\AppData\Roaming\Adobe\CameraRaw
- Mac OS: /Users/[user name]/Library/Application Support/Adobe/CameraRaw
Plugins
Most, if not all, the plugins will be copied across inside the Lightroom folder you copied from your old computer: –
- Windows: \Users\[user name]\App Data\Roaming\Adobe\Lightoom
- Mac OS: /Users/[user name]/Library/Application Support/Adobe/Lightroom
However, if you have issues launching any of your plugins, I recommend visiting the vendor’s website and downloading a fresh copy. Install the new copy into Lightroom as per the vendor’s installation instructions.
Conclusion
You’re all done. If you followed this guide, you should be up and running with your new copy of Lightroom on your new computer or drive. If you have any issues, please feel free to comment below or email me via the contact page.


Martin, this is a very timely article. When the new MacBook Pro 16″ is launched this is exactly what I have to do. Whilst I have not yet followed the instructions they look very clear. Thank you.
David,
You are welcome. I would encourage you to download the full eBook and read through it before the move. The process is simple enough, but it is wise to know how to do it correctly beforehand.
Martin.
GREAT POST!
THANK YOU FOR SHARING…
This is so helpful.
I ran into one issue… my mobiledownloads.lrdat on my new hard drive is greyed out, so I can’t point these missing photos to the new location.
Nice article! Very Helpful. Thanks for sharing. Keep inspiring us. 🙂
Best article! Thank you for sharing. Very Helpful. 🙂
Hi I’m about to move to a new mac and need to follow this procedure. Question – I’m currently running LR 6 but now wish to use Lightroom classic, do I have to move Lightroom cat across using LR 6 before upgrading to LR Classic or can I start with LR classic on the new mac and move the old LR6 cat across to it?
Lee,
You can move the Lr6 catalog across to a new install of LrC on your new computer. When you open the catalog on the new version of LrC, you will be asked to update the catalog to work with the new version of LrC. The upgrade process is necessary and harmless. Say yes to the upgrade when presented with the option.
I hope this helps.
Martin.
After two failed tries to move LR CC catalog and photos to my new PC, I found this post. Thank you so much! Your step by step process was a win. Making the move from one PC to the next is not as easy as some folks make it out to be. There are a few key steps that can make or mess up the transition–and you nicely laid out the right ones. There was one extra step I had to take for my catalog to find my photos. When I was in Library, all looked great. No question marks by the folders. But when I opened up Develop, it said File could not be found for any photo I chose. I uninstalled, reinstalled LR. Clicked on folders in the Library and it was saying the folders were there. So finally I found out there is a Merge option. When I clicked it and went to the Develop module, the photos were all found. Hope this helps someone out there! Thank you again for taking time to lay out this process. With gratitude, Carole
I just noticed and wanted to clarify an error in my comment. It was not LR CC I was moving to a new computer. It was Lightroom Classic. Thanks again! -Carole
Great instructions, thanks so much. My migration to my new MacBook went well but it seems that none of my applied edits, ratings, etc. made it in the transition – where did I go wrong?
Thank you so much. There are many articles and explanations concerning this topic out there. This is the most comprehensive and helpful I could find. Following these steps made my Transition from LR6 to LRC go smooth without any issues.
Thanks again for sharing.
Pius
Nice and clear instructions, worked well for me, thank you. Unfortunately I am getting meta dater error in some folders, not sure if this is linked to move or something else, lrclasic on windows 11