
Make the Background Layer Editable
The Background Layer inside Photoshop is the default layer that your image sits on when you first open it in Photoshop. The Background Layer is locked to prevent you from performing certain edits or prevent you moving it. You can see that it is locked by the presence of a small padlock icon to the right-hand side of the Layer.
![]()
Sometimes, and I must emphasise the word “sometimes”, you may wish to make the Background Layer editable. To unlock it, you just need to click on the padlock icon. Alternatively, you can double-click on the layer to open the New Layer dialogue box. Here you can give the Layer a name before pressing OK.
![]()
Move Layers Up and Down the Stack
To move a Layer’s position in the stack, you can click and drag it up and down but as always in Photoshop, there is a keyboard shortcut for this.
While working on a Layer, press Ctrl [ (Windows) or Cmd [ (Mac OS) to move the active Layer down the stack and press Ctrl ] (Windows) or Cmd ] (Mac OS) to move the active Layer up the stack. If you add the Shift key to this, you can move the active layer to the top or the bottom of the stack in one step.
Just to add to this quick tip, if you change the Ctrl/Cmd key for the Alt/Option key, you can change which Layer becomes selected rather than moving Layers.
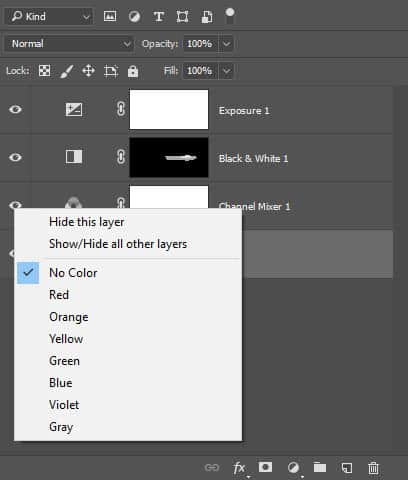
Colour Code Your Layers
If you have a lot of Layers to work with, you can apply a colour code to the Layer. This makes it instantly recognisable in the stack of Layers. You could develop your own colour coding system where one colour always represents a certain kind of layer. For example, red could be applied to all the pixel-based layer, blue to all the adjustment layers, yellow to all text layers and so on.
To add a colour code to your Layers, right-click on the eye icon and select a colour from the list that appears.
Set the Default Foreground and Background Colours
By default, Photoshop sets the foreground colour to white and the background colour to black. These foreground and background colours are Photoshop’s way of using the painting tools. For example, the Brush tool will paint with the foreground colour.
If you have changed the foreground and background colours and wish to revert to the defaults of 100% white for the foreground and 100% black for the background, simply press the D key. Think D for Default.
![]()
Switch the Foreground and Background Colours
To switch the foreground and background colours, regardless of what they are currently set to, press the X key. Think X to exchange. Alternatively, you can click on the small arrow next to the foreground and background icon normally located at the bottom of the toolbar.
![]()
Move Around Quickly
Often when we are zoomed in on an image, it is necessary to move our view of the image. This can be done very quickly by pressing and holding the Spacebar. While the Spacebar is pressed, Photoshop will switch to the Hand tool and you can drag your view of the image around. When you let go of the Spacebar, Photoshop will revert you to your active tool.
Paint Straight Lines
When using the brush tool to either paint on the Layer or to paint on the Layer Mask, hold down the Shift key to paint a straight line. To use this quick Photoshop tip with the Brush tool, click once on the image, move your mouse to the second point and with the Shift key pressed, click once again. Photoshop will joint the two points with a straight line painted with the current Brush tool settings.
This same tip also works with the various cloning tools.
Conclusion
This article only deals with 15 Photoshop quick tips and they were the first 15 that sprang to mind as I was writing. Photoshop is such a huge and varied package that I could easily have included 115 tips, but it would have taken a week to type at my typing speed and you’d have gotten bored reading it. So, 15 it is.
Please comment below and let me know of any Photoshop quick tips you know of.


Leave A Comment