We are often asked by people starting out with photo editing about the difference between destructive and non-destructive editing. Let me try to explain the difference in some detail. I’ll describe destructive editing first then move onto non-destructive editing.
Destructive Editing
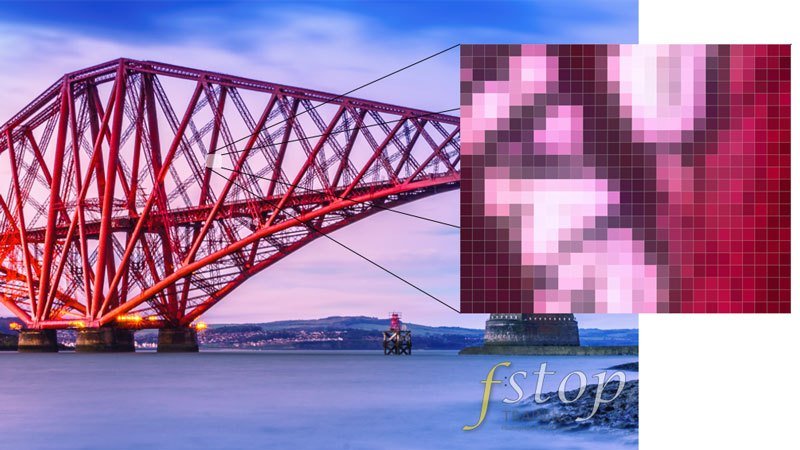
The term destructive editing does not mean that you actually destroy your image; in most cases, you will improve it. Rather, it refers to the way in which the pixels of the digital photograph are manipulated. When you make changes to a photograph as part of a digital editing process that is destructive, you actually make permanent changes to the pixels. For example, if you darken an area of the image, the pixels within the image will be changed to become darker. When the image is then saved, those darkened pixels will be written into the image permanently and cannot be returned to their original state. Thus, the original state of the pixels is considered to have been destroyed. Hence the term “destructive editing”.
This is the most common way of editing digital photographs and for many years it was the only way. Adobe Photoshop and Adobe Photoshop Elements are the two most common editing software packages on the market and they are both examples of destructive editing applications. It is possible to use Photoshop in such a way that it is non-destructive, but this requires that you have a little more knowledge of Photoshop and know how to take advantage of layers. I will cover this in a separate article and this is a technique that we teach during our workshops.
Non-destructive Editing
With the description of destructive editing in mind, I’m sure you can decipher what non-destructive editing is but I will explain it in some depth. Simply put, non-destructive editing is a process in which the editing software does not change the pixels within the digital photograph. So how does it manage to change the appearance of the image if it doesn’t change any of the pixels?
The software package will create a new file that is linked to the digital photograph. This new file is often referred to as the “sidecar” file and is nothing more than a text file. In this sidecar file, the software package will create a list of instructions that tells the software what changes to make to the original digital photograph. The software package will show you a real-time preview of what the changes will look like, if and when you chose to apply them. The changes you make at this stage can be reversed, increased, decreased or tweaked in countless ways until the image looks exactly how you want it to. Once you are happy with all the changes, you do not simply save the file, as you would do with a destructive workflow, instead you “export” a copy of the photograph.
By exporting an adjusted version of the photograph, you end up with two copies; the original and the adjusted version. This way the original photograph is still intact along with its sidecar file that has all the adjustments you made listed as nothing more than a set of instructions. If you wish, you can reset the original image back to its original state simply by telling the software to delete the set of instructions it holds in the sidecar file. Additionally, and this is one of the huge advantages of a non-destructive workflow, you can tweak the adjustments listed in this sidecar file and produce several copies of the original file.
Let’s say you have a photograph and you can’t decide between a colour version or a black and white version. With a non-destructive workflow, it becomes easy to export two copies of the original photograph; one in colour and one in black and white. This will be covered in a separate article and it is a topic we cover in detail during our Adobe Lightroom one-day courses. If you take a look at our article on colour or black and white you will see an example of exporting different versions of the same file. In this article, we took a portrait and produced four different versions but we still have the original untouched photograph. This way, the client can see several versions and decide which one they prefer.
The advantages of this non-destructive workflow are easy to see; you keep the original file intact. There is a disadvantage to a non-destructive workflow. The sidecar files that are produced and updated by the software can only be read by that one particular software package. If you stop using the software and switch to another brand, you will not be able to see the adjustments you spent so long producing and perfecting. Therefore, it’s vital that you research which brand offers the features most suited to your needs. By far, the most popular and feature-rich package is Adobe Lightroom but ultimately the choice of which non-destructive software package you use will depend upon your budget and your needs. Even when this disadvantage is taken into consideration, I would always recommend you adopt a non-destructive workflow.
The non-destructive workflow is often associated with raw files but can also be used with JPEG images. However, it lends itself better to raw files because of the amount of data contained within a raw file. The adjustments and associated sidecar file do not add a significant amount to the file size but do have much more scope when the original file is a raw file.
Examples of Destructive and Non-destructive Editing Software Packages
The type of software package that you use to edit your photographs will have a bearing on whether you employ a destructive or non-destructive editing workflow. I have listed some examples of each type of software package below but remember that even the destructive editing software packages can be used in a non-destructive way. Albeit, with a little more work and knowledge.
| Destructive Editing Software | Non-destructive Editing Software |
| Adobe Photoshop | Adobe Lightroom |
| Adobe Photoshop Elements | Adobe Camera Raw (ACR) |
| Serif PhotoPlus | Aperture |
| Paintshop Pro | Bibble |
| PhotoStudio | Capture One |
Please let us know what your thoughts are and comment below. Thank you.


This is a clear, helpful explanation of non-destructive image editing. But here’s a question. Once you have produced 2 versions of a raw image in sequence, call them A and B, the sidecar values saved to disk will relate to B. How would you then revert to version A as a starting point for a new version C? Yes, you would have an exported jpeg or tiff to refer to, but that won’t help you directly to revert to image A settings, other than by guesswork and experiment, especially if the edited images are the result of many steps. So it may still be quicker to produce version D by starting from scratch with the unedited raw file, but that would seem largely to negate the advantage of the non-destructive process.
Martyn,
Wow, that was complicated to read. I almost had to draw a diagram but I think I understand what you are asking. Would I be correct in thinking that you want several versions of the same raw file? If so, here’s a quick explanation of how you achieve that in Lightroom, or any other raw editor.
Firstly, you do not actually produce 2 versions of the same raw file; only your camera’s sensor can produce a raw file. What you do inside Lightroom is create a “Virtual Copy”. You can create as many Virtual Copies as you wish and edit each independently. This way, you will have several options to choose from when you export.
Creating Virtual Copies does not create a new raw file, it simply creates a copy of the data file used for editing.
Also, it is very easy to revert the master raw file to its original state, or any other state during the editing process, simply by using the History panel on the left-hand side of the Develop module. Lightroom records every action that you take on a file. You can even create snapshots at different points in the editing process to go back to quickly.
I hope this helps.
Martin.
With a so-called “destructive” editor like Photoshop, yes it is POSSIBLE to overwrite the original image but your workflow should be such that this never happens. Write the new file using “save as” rather than save and you have a new file with a different name and the original file – just as happens if you export from Lightroom. The “destructiveness” is a false bogey-man.
Ron,
Thanks for your comment. You are quite correct. There are several workflows that will allow the use of Photoshop in a non-destructive manner. However, Photoshop does actually alter the pixels of the image whereas Lightromm never actually touches the pixels. Rather, it creates a small instruction file that Lightroom interprets and shows a preview of the changes on screen. It then uses this file to create a new version of the image if and when you export it.
Photoshop, regardless of workflow, alters the pixels of the image. Therefore, you do need to use a workflow that protects the original pixels. One option is duplicating the Background layer before making any changes. Also, the use of adjustment layers helps to protect the pixels of the Background layer.
Martin.
Hi Martin,
Thanks very much for putting the time into these descriptions; very helpful for me to help describe these concepts to students!
To piggy-back on what Ron was saying, I think you’re classifying Photoshop as “destructive” based on a technicality pertaining to how the software works under the hood, not how the user interfaces with it. I worry that novice users will decide that if Photoshop is “destructive,” they should avoid it because that’s a less sophisticated way of interacting with imagery (the “false bogey-man”). To a user, Photoshop is only “destructive” if they don’t know how to use the software, as you know and as Ron pointed out. Essentially every filter, adjustment, etc. can be implemented non-destructively.
Just want to make sure novice users don’t get the wrong idea and think that the extensive features of Photoshop are not accessible in non-destructive workflows.
Thanks again,
JDL
JDL,
Thank you for your comment and I see your point. Photoshop can indeed be used in a non-destructive way and doing so is always the way I show others how to use it. In fact, there are several techniques to using Photoshop in a non-destructive way, but that was not really the point of this article when it was written.
I was merely trying to highlight that Raw processing software, such as Lightroom, never alters the original pixels of an image, whereas Photoshop can alter the pixels. This altering of pixels is often referred to as “destructive”.
The skill is knowing when and how to avoid this destructive style of editing in Photoshop or similar software programs.
Jpeg is a destructive image file format?
Please give me answer
Khileshwari,
JPEG images cannot be saved with layers, which means that saving to JPEG will always flatten an image and all adjustments are written to the pixels. The pixels of the image are physically altered. In other words – the pixels of the original image are destroyed. Additionally, repeatedly opening, editing and saving a JPEG image will cause further compression and degradation to the image.
Martin.