
One of the best ways to increase the tonal range of your digital photographs is to set the white and black points in Adobe Lightroom. This is an accurate way to ensure you have extracted all the dynamic range from your image without causing clipping. This is a technique that has been used for many years in Photoshop with the Levels and Curves adjustment tools. However, if you have a batch of images to adjust, using the Levels or Curves tools in Photoshop would be rather labour intensive. So, let’s see how to set the white and black points accurately using Lightroom.
Step 1:
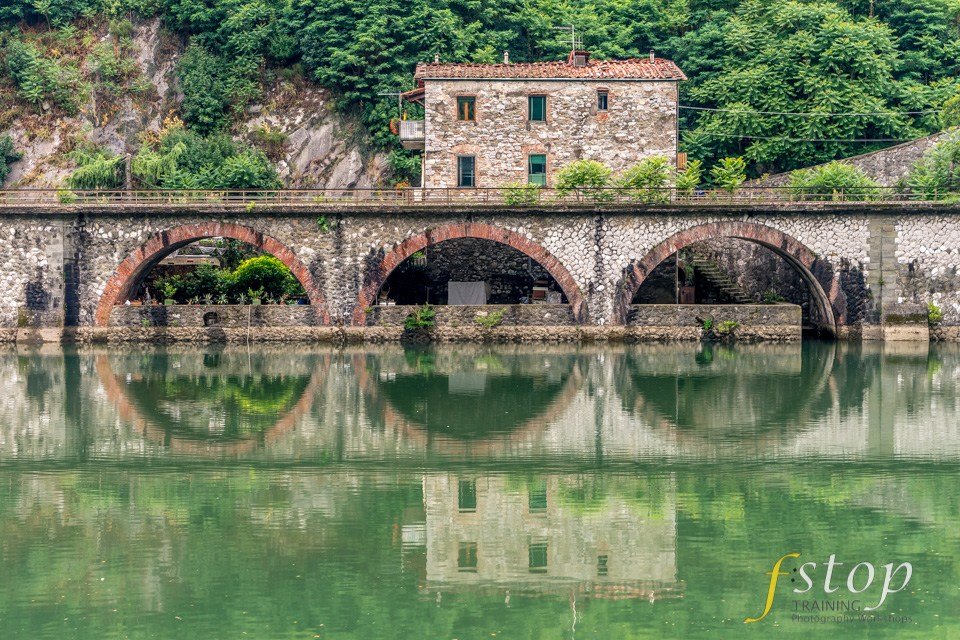
This is the image we will be adjusting. It looks a bit flat, as do all Raw images straight out of the camera, but after adjusting the white and black points it will look a whole lot better. This is a photograph that was taken during a trip to Tuscany earlier this year. It was one shot in a series that would later be later stitched together using Adobe Lightroom to form one large panoramic image.
Looking at the histogram, you can see the image has a limited range between the white and black points but by using the white and black point sliders in Lightroom, we can expand this range into the areas at either end of the histogram that are missing information. The trick with this technique is to keep an eye on the histogram while moving the sliders.

Step 2:
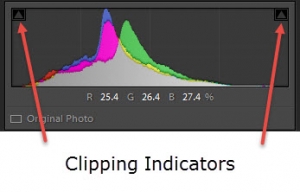
To accurately adjust the dynamic range of the image and make it look more alive, all we have to do is drag the white and black point sliders found within the Basic Panel in the Develop module. Dragging the white point slider to the right will stretch only the lighter parts of the image while moving that part of the histogram to the right. As we move the white point slider, keep an eye on the white point clipping marker. If this lights up with a colour, you have gone too far and you need to back off the white point slider a notch. The moment the clipping marker returns to dark grey, you have the white point set accurately. If you were to leave the white point clipping marker illuminated, some of the brightest parts of your image would have no detail in them – they would be clipped. If this image was ever printed, the bright parts would be blown out to pure white and, trust me, this usually looks rubbish!
Step 3:
In this step, we’ll set the black point and it is basically a repeat of the last step but with a subtle difference. The difference being, it is acceptable to allow the black point to be slightly clipped. The reason being, very dark areas of an image will not look displeasing to the eye if there is no detail at all. Even in real life, our eye doesn’t pick up as much detail in dark areas as it does in light areas, therefore a photograph with a few clipped black areas won’t look wrong to our eye. Also, allowing the blacks to clip slightly will further increase the dynamic range and contrast of the image.

With both the white and black points accurately adjusted, we can see a dramatic difference in the dynamic range and contrast of the image already.

The Alt Method:
This keyboard-assisted technique will ensure complete accuracy when adjusting both the white and black points. While dragging the sliders, hold down the Alt key. This will give you a masked view of the image and show you the actual pixels that are being clipped as you drag.
While dragging the white point slider, the image turns black and bright pixels will appear through the black mask as you drag the white point slider to the right. The inverse is true for the black slider. These pixels that burn through the mask are the very ones that will be clipped.
Remember, the same rule applies about not allowing any white pixels to become clipped but it is acceptable to allow some black pixels to clip. This is the normal rule, but I’m sure the pixels police won’t mind if a few highlight pixels get clipped. For example, it is unavoidable to have the sun clipped in an image of a sunset. Equally, streetlights, candles and most light sources will almost always be clipped in a photograph, but the general rule is not to allow any highlights to become clipped.
This Alt method is the one I always use.
Auto Method:
Since Lightroom version 5, a little-known trick was added in relation to adjusting white and black points. Rather than dragging the sliders, hold the Shift key and double-click on the word “Whites” and the word “Blacks” at the left side of the slider, to have Lightroom automatically set the white and black points for you. Try it and you’ll notice that Lightroom doesn’t clip any highlights but does allow some blacks to clip. This will work for the vast majority of your photographs but remember if you have images where highlights would clip naturally (sunset), you will have to take manual control of the Whites slider.
Conclusion
This is only a couple of adjustments that are needed to produce a good photograph from a RAW file but as you can see, they are probably the most important tonal adjustments you can make. Don’t overlook them in favour of the simple and rather crude Exposure slider. Skip the Exposure slider and move directly to the white and black points sliders.


Can you comment on why sometimes the white-point and black-point while holding alt does not work? Is this a glitch in LR or does it get turned off somehow? I keep trying to google this info and it is hard to find. It is annoying because I use it all the time and can never remember how to turn it back on. Thanks so much!
We photographers appreciate your educational info a ton!! -Steve SWJones.com
Steve,
Thank you for your comment. I assume you are referring to holding the Alt key while dragging the White and Black sliders? As you do this, you should see a black mask when you drag the White slider and a white mask as you drag the Black slider. As you continue to hold the Alt key and move the sliders, you will see areas of the mask becoming broken with colour and then either black or white pixels.
This technique only works when you drag the White slider to the right and the Black slider to the left. It will not work if you are dragging the sliders in the opposite direction.
Assuming this is how you are using the Alt key and the sliders in combination, I cannot think of any reason why this would work intermittently. Can you email me a screenshot?
Martin.