
You should always move your photographs using Lightroom rather than using the operating system of your computer. Moving photographs with Finder (Mac OS) or Explorer (Windows) might seem like the logical thing to do, but it can cause untold grief when you come to look for those photographs inside Lightroom.
You see, when you move photographs using Finder or Explorer, the link that Lightroom created inside its catalogue to their location on your computer gets broken. This broken link means that Lightroom cannot locate or reference the photographs and it treats them as being missing. Without this reference, Lightroom cannot edit or export the missing photographs. In reality, the photographs are not missing from your computer, they are only missing from Lightroom’s catalogue.
In my experience, moving photographs outside Lightroom is one of the most prominent mistakes photographers make when organising their computer storage.
Before I describe how to move your photographs using Lightroom, let’s first look at how to find missing photographs inside Lightroom, and restore those broken links.
Missing Photographs
When you use Finder or Explorer to move your photographs, they go missing inside Lightroom. The photographs still exist, but only you know where they are. Lightroom has no idea that you moved them. Therefore it can’t find them. So, when you launch Lightroom, you will see a question mark next to the folder of images that you moved using Finder or Explorer.
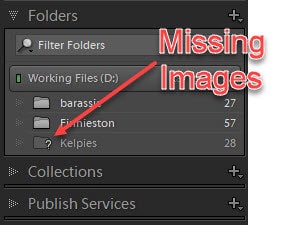
Missing Folder of Images
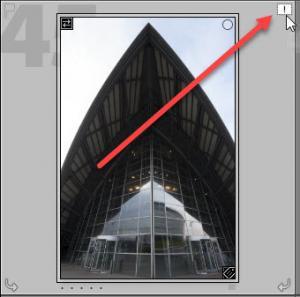
If you have moved or deleted individual images using Finder or Explorer, you will see a small exclamation mark on the top-right of the thumbnail preview.

Missing Image
Locating Missing Photographs in Lightroom
No doubt you have made this mistake and now have a Lightroom catalogue that is filled with question marks and exclamation marks. If so, the good news is, you can fix this very quickly.
To remove the question mark from a missing folder:
- In the Library Module, right-click on the folder that has the question mark;
- Click on Find Missing Folder from the flyout menu;
- Navigate to the new location of the folder on your computer;
- Select the folder;
- Lightroom will now update its catalogue, and the question mark will disappear. You can now edit and export the previously missing photographs.
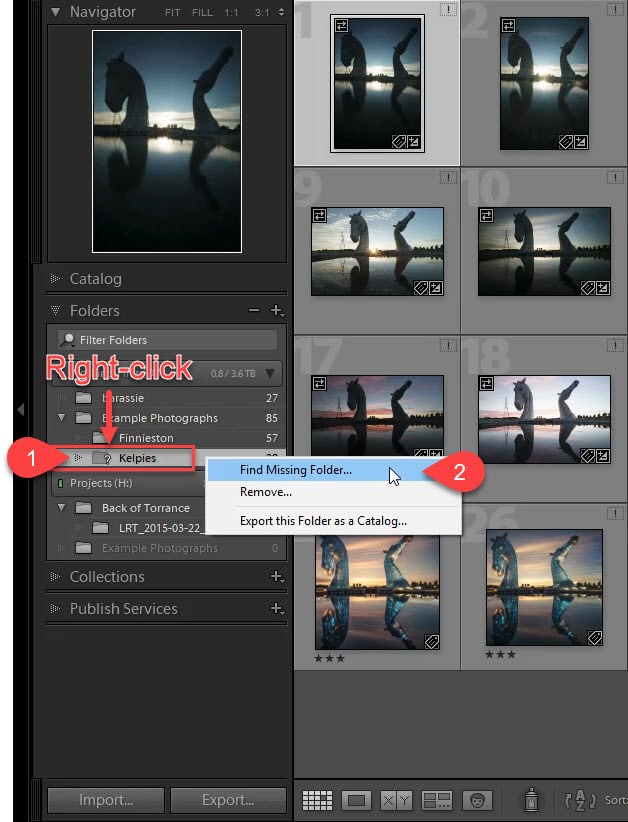
Right-click folder
To remove the exclamation mark from a missing image or images:
- In the Grid view of the Library Module (press the G key to view the grid), click on the exclamation mark located at the top right of the missing image;
Click on Exclamation Mark
- Click on the Locate button that appears;
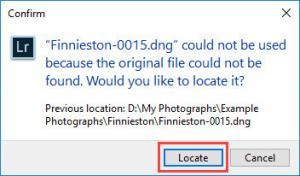
Locate Missing Image
- Navigate to the location of the missing image;
- If you place a tick in the box next to Find nearby missing photos, Lightroom will automatically attempt to locate other missing images inside the same folder.

Find nearby missing photos dialogue box


I have no doubt that everyone, myself included, has moved or deleted photographs using the operating system of your computer, rather than performing the task inside Lightroom. If so, you will have encountered one or both of the issues described above. So, my advice is to fix the question marks on folders and the exclamation marks on individual images then, don’t do it again!
Use Lightroom for all your organisation. And I do mean ALL. Let’s look at how to move your photos using Lightroom then I’ll describe how to delete your photos using Lightroom.
Move Your Photos Using Lightroom
Let’s do this the right way. Moving photos from one location to another should always be done inside Lightroom. To move your photos using Lightroom:
Moving individual images:
- Make sure that you are in the Grid view by pressing the G key;
- Select the images that you want to move;
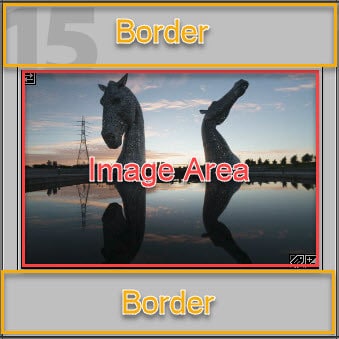
- Click and drag from the image area of any selected thumbnail (not the border) to the destination folder. If you drag from the border area, nothing will happen. This subtlety can be very frustrating;

Image v Border area
- The photos will now move on your computer and Lightroom will update its catalogue to reflect the changes. No more lost file exclamation marks.
Moving folders:
- Ensure that you are in the Library module;
- Inside the Folders panel on the left-hand side, select the folder(s) that you want to move;
- Click and drag the folder to the new location on your computer. If you are moving the folder to an external hard drive, make sure the drive is connected and has power. As you move the folder, your mouse pointer will change to show a small rectangle next to the arrow;

Mouse Pointer showing move
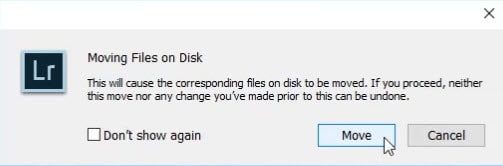
- Release the mouse button over the location you want to move your folder. You will get a dialogue box warning you that this move cannot be undone. Don’t panic. All this refers to is the Edit > Undo command won’t work. If you make a mistake, let Lightroom complete the move and just repeat the process to move the folder to the correct place;
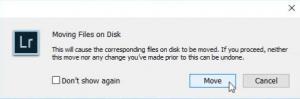
Moving files warning
- You will see the progress bar at the top left of the screen as the move is underway;
- Your folder and images have been moved on your computer and Lightroom will update its catalogue.
Deleting Your Photos Using Lightroom
If you delete photographs from your computer using Finder or Explorer, you will confuse Lightroom and yourself.
Deleting photographs outside of Lightroom will not update the catalogue or the links that Lightroom had created for those photographs. So, the thumbnails will continue to show inside Lightroom, but you will see the usual exclamation marks.
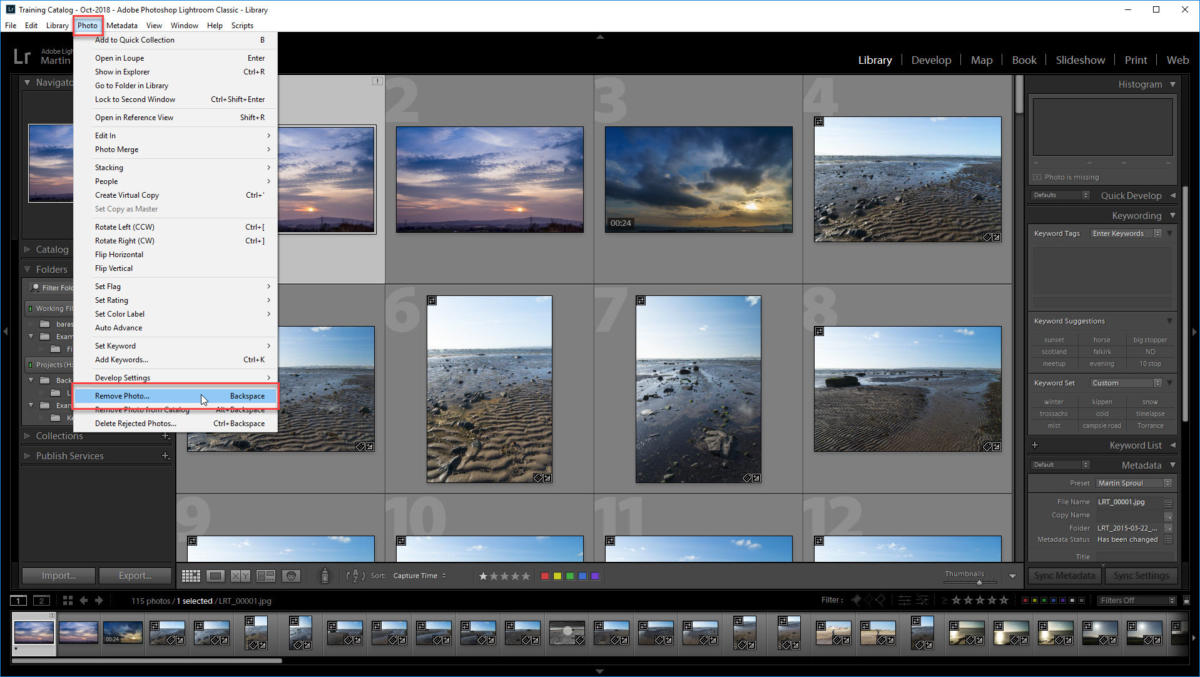
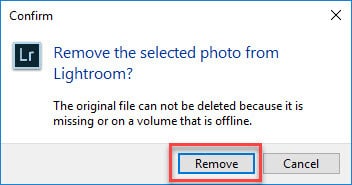
To remove previously deleted photos from Lightroom’s catalogue:
- In the Library Module, select the photograph(s) that you want to remove from Lightroom’s catalogue;
- Navigate to the top menu and click Photo > Remove Photo;
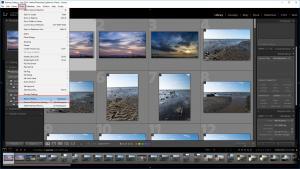
Photo Menu
- In the dialogue box that appears, click on Remove;
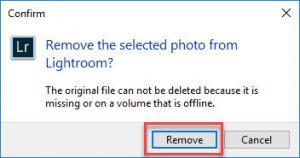
Remove Photo dialogue box
- Lightroom will remove all references to the photograph(s) from its catalogue. The thumbnails and preview of the images will no longer be visible inside Lightroom.
To delete photographs using Lightroom;
Using Lightroom to delete photographs from your computer is the preferred method. Using Lightroom to delete them will ensure they are not just removed from your computer, but also deleted from Lightroom’s catalogue. To use Lightroom to delete photographs:
- In the Library Module, select the photograph(s) that you want to delete from your computer;
- Navigate to the top menu and click Photo > Remove Photo;
- This time, a different dialogue box will appear. This dialogue box has an additional option; Delete from Disk. This Delete from Disk option is the one that you want to select. This option will delete the photograph(s) from your computer and Lightroom will update its catalogue by removing all links and references to the photograph(s).
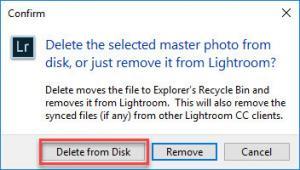
Delete image dialogue box
Conclusion
Knowing how to move your photographs using Lightroom will save you a lot of time and anguish. I have no doubt that we have all moved and deleted our photographs utilizing either Finder or Explorer. Moving files and photographs in this way will come naturally to us because it’s the way we have always done it; we are comfortable using Finder and Explorer. But, don’t do it when it comes to moving or deleting photos.
Always move your photographs using Lightroom and always delete using Lightroom.


Leave A Comment