
Lightroom previews will be made automatically by Lightroom as it imports photographs. Lightroom uses these previews to display the thumbnails in the grid view inside the Library Module as well as the larger previews in the Loupe view, Develop, Slideshow, Print, and Web modules. You have the choice of 4 sizes of Lightroom previews that can be generated during the import stage.
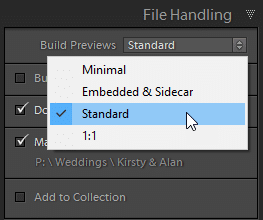
The 4 choice of Lightroom Previews
Here’s what Adobe states about the different sizes of its Lightroom previews:
Minimal – These previews are the small, low-resolution JPEG previews embedded in the photos, which the camera generates. They are the fastest type of preview to create. The Filmstrip and Grid view of the Library module use minimal previews temporarily until Lightroom renders standard-size previews for those thumbnails.
Embedded & Sidecar – These previews are larger, also camera-generated, and they take a little longer to create than minimal previews.
Standard – Lightroom creates standard previews. They use the Camera Raw engine for processing. So, they sometimes appear different from minimal or embedded previews, especially if you have applied adjustments in the Develop module. You can specify the size of the Standard preview you need, based on the display you use. Standard previews are used in Filmstrip and Grid view thumbnails, as well as in preview and content areas of the Slideshow, Print, and Web modules.
1:1 – These previews are a 100% view of actual pixels and, like Standard previews, the Camera Raw engine processes them. When Lightroom generates 1:1 previews, it also generates minimal and standard previews, so all three are available to the program as needed. Because so much data is being processed, 1:1 previews can take a significant amount of time to create. Any time you zoom to 1:1 or higher in the Library module, Lightroom uses 1:1 previews.
As you can see from Adobe’s explanation, each of these choices will generate previews of different resolutions. The higher the resolution, the higher the file size stored inside the Lightroom Catalog on your computer. Additionally, Lightroom will need more time to build these previews after importing your photographs.
You will need to build either Standard or 1:1 previews to allow you to work with your photographs inside Lightroom. So my advice is not to build Lightroom previews that are larger than you need; it’s simply a waste of disk space and time. Here’s how to ensure you don’t build Standard Lightroom previews that are larger than you need.
On a PC, click on the Edit menu and if you’re using a Mac, click on the Lightroom menu and choose Catalog Settings. This will bring up a dialogue box with three tabs. Choose the File Handling tab and from the drop-down list next to Standard Preview Size, choose either Auto or 1440 pixels.
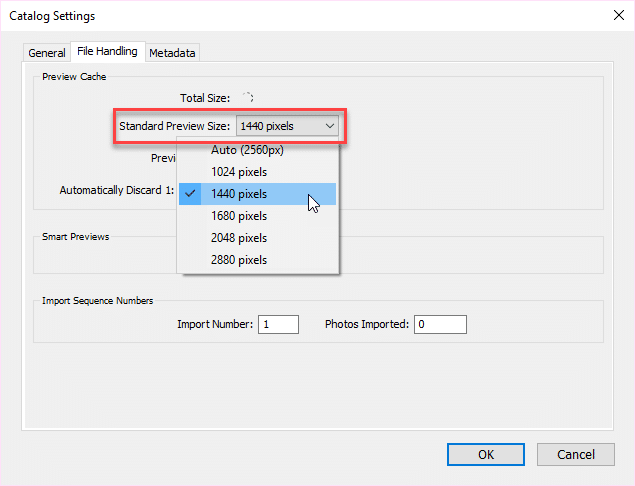
Standard Previews Size
If you select Auto, Lightroom will automatically generate previews that are appropriate to your screen’s resolution. In my case, this is 2560 pixels. However, I find this is an unnecessary size and I have manually chosen to build Lightroom previews that are 1440 pixels. For me, this is large enough to work on the images. I get good resolution and don’t have to build thousands of Lightroom previews that are bigger than I need.
Conclusion
Building Standard Lightroom previews is a necessary step to take if you want to work on your images inside Lightroom. These previews will take some time to build and add to the size of the Lightroom Catalog. So, it is wise to ensure you are not wasting your time and using up disk space by building previews that are larger than you need.
My advice is to use the Auto setting if you have a monitor that has a resolution of 1080 pixels, or less. And, if you have a monitor with a higher resolution, use 1440 pixels. Remember, the size of these previews has no influence on how the final images are exported.


The problem arises when two monitors are used, previews are thus generated for the smaller monitor and then to be worked with on the larger one. Then it is necessary to generate the previews again for a larger dimension. And that’s just a waste of precious time