
In this article, I am going to describe how to clean your camera sensor using swabs. The majority of photographers will get very nervous at the prospect of cleaning the sensor on their digital camera. I understand this trepidation, but it is quite a straightforward procedure. But, before diving right into describing the sensor cleaning process, you first need to know what sensor dust is and how to check for sensor dust.
What is Sensor Dust?
Sensor dust is precisely what the name suggests; it is dust that has found its way inside your camera and onto your camera’s sensor. All digital cameras with interchangeable lenses will gather sensor dust. When I say “all”, I do mean all. Every time you change the lens on your camera, you are exposing the inside of the camera to the atmosphere. The atmosphere is full of dust particles. This dust may not be visible to you while you are swapping lenses on your camera, but it is there, and eventually, it will become apparent on your images.
You can develop a technique for changing the lens that will limit the amount of dust that enters your camera, but technique alone will not stop dust from getting stuck on your camera’s sensor.
When you remove the lens from your camera, ensure that you keep the camera pointing downwards. Pointing the camera downwards will limit the number of particles that can fall into your camera. Additionally, try not to change your lens in a windy environment. This is not always possible, but it is worth keeping in mind.
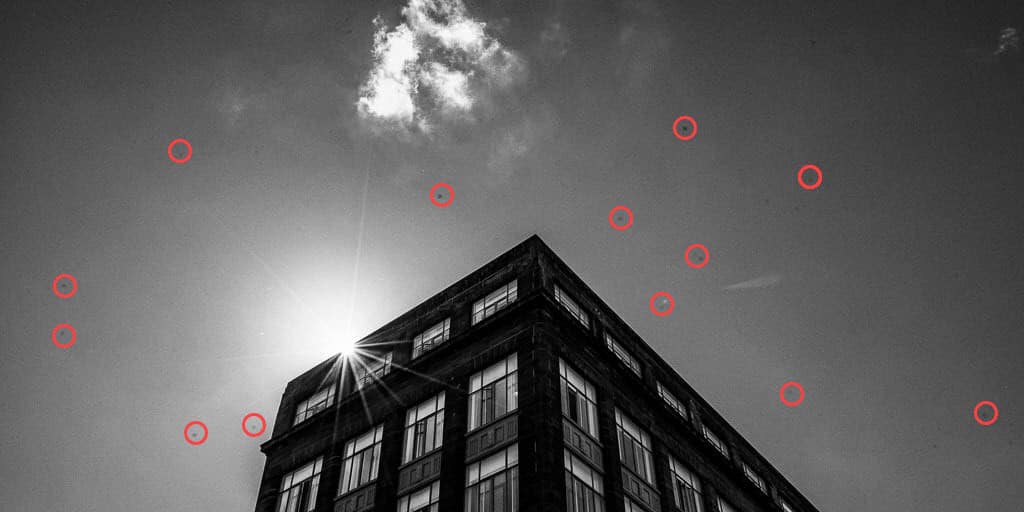
Sensor dust is visible in your photographs as blurred spots. They are more evident in areas of low contrast, such as the sky. The image below makes it too easy to see what sensor spots look like on a photograph. Note, the spots are more pronounced on images that were shot using a small aperture. For example, an image shot with an aperture of f/16 will have more clearly defined sensor spots than an image shot with an aperture of f/2.8.
If you are using a DSLR, you may see dust while you are looking through the viewfinder. However, this dust is on the camera’s mirror, not the sensor. Therefore, this dust will not appear on your image. If you are using a mirrorless camera and you see dust through the viewfinder, this dust will appear on your image. When you look through the viewfinder in a mirrorless camera, you are seeing an exact copy of what your camera’s sensor is “seeing”.
How to Check for Sensor Dust
The method that I use to check for sensor dust is straightforward and does not require any specialist equipment. To check for sensor dust on your camera’s sensor:
- Set the aperture on your camera to its smallest setting;
- Set the ISO to 100. This will ensure the shutter speed is slow and you will not be confused between dust spots and noise from a high ISO setting;
- Your camera should ideally have a shutter speed of 1/30 second or slower. I usually aim for a shutter speed of ½ second. Now point your camera at a bright area with low contrast. The area must fill the entire frame. I use either a white wall or a white piece of paper, but a bright grey sky works well too. Take the picture while moving your camera slightly throughout the exposure. This movement will blur the image;
- Review the image on your camera using either the viewfinder or the LCD screen. Because you had deliberately taken a blurred photo of a plain and bright subject, any dust on your sensor will be clearly visible. Remember to zoom in on the image as you preview it. The best way to inspect the image is to load it onto your computer and view it at a zoomed level;
- If you see dust, then it’s time to clean.
Don’t’ panic! It’s a lot easier than you may have been told.
Clean Your Camera Sensor Using Swabs
I would like to point out that your decision to clean your camera sensor using swabs is your decision. I am not forcing you to clean your camera sensor using swabs, and I am not present to supervise you.
Before you dive right into cleaning your sensor using swabs, I would recommend this first step:
Use a Manual Air Blower
- Try to dislodge the dust using a manual air blower. You can purchase blowers that are specially designed for cleaning camera sensors. The one I recommend is the Giottos Rocket Air Blower. These can be bought from any good camera shop or Amazon;
- If you are using a DSLR, you will first need to select manual cleaning mode from the menu. Please consult your camera’s manual or do a quick Google search on how to choose manual cleaning mode regarding your camera make and model. Ensure that you have a fully charged battery before entering cleaning mode.
- When manual cleaning mode is selected, you will hear the mirror lock in the up position. The mirror will remain in the up position until you power off the camera. If the camera battery runs flat, the mirror will close without warning;
- If you are using a mirrorless camera, you do not need to select manual cleaning mode. Nor do you need to have a fully charged battery in the camera;
- Remove the lens;
- While holding the camera upside-down, use the blower to blow air up and on to the sensor. Do NOT put the tip of the blower past the lens mount and inside the camera;
- I usually give about six blasts with the air blower;
- Replace the lens and take another shot, as described above. If you’re using a DSLR, you will need to first switch off your camera before taking the shot;
- Check to see if that has dislodged the dust. If so, there is no need to proceed further. Job done! Often, there will still be some stubborn spots left on your sensor.
Even if this did not remove all the sensor spots, it is always a worthwhile exercise. Using the manual air blower ensures that any loose dust is removed before you use a wet swab.
IMPORTANT
Using A Wet Swab to Clean Your Camera Sensor
This is my preferred method for cleaning the sensor on my cameras. I have performed this cleaning method dozens of times and am quite confident that it poses no harm to my camera. Experience has shown me that wet swab cleaning is the only method that I can be convinced will completely remove all the dust spots.
Before proceeding with this method, please remember that you will never be swabbing the actual sensor of your camera. All camera sensors have a plain glass sheet placed in front of them. It is this glass sheet that you will be cleaning. The term, “cleaning your sensor” is inaccurate. It is the glass in front of your sensor that you will be cleaning. Regardless, if you do scratch it, you will need to send your camera off for repair. But, with care, it is unlikely that you will scratch the glass in front of the sensor. The method that I use is identical to that used in camera shops.
If you are terrified of damaging the glass that covers your sensor, then I would recommend that you use a local camera store that offers a cleaning service. Just remember that it is expensive, and you will quickly become friends with the staff. Digital cameras need their sensors cleaned regularly.
So, let’s do this:
- Follow steps 1 to 5 as described above;
- Place your camera on a flat surface with the LCD screen down and the sensor facing up at you (I use a cloth to rest my camera on). This will ensure that you can see the sensor;
- Use a specially manufactured swab and solution. I have always used the swabs and solution manufactured by VSGO. It is rare that you can purchase these from camera shops because they would be doing themselves out of business. Instead, you will need to resort to online retailers like Amazon. Ensure that you purchase swabs that are the correct size for your camera’s sensor;
- Add no more than two or three drops of solution to the swab. Do not oversaturate the swab. This will cause streaking on the sensor, and you will need to clean it again with a fresh swab;
- Place the wet swab onto the sensor at one side. With gentle but firm pressure, slowly move the swab across the entire length of the sensor. The swab handle will bend to prevent you from pressing too hard;
- When you reach the far end of the sensor, lift the swab and turn it around. Repeat the process starting from this side of the sensor and swabbing back to where you started;
- Lift the swab off the sensor and discard it. Never use a swab more than once;
- Take another test shot. If the sensor is now clean, you’re done. If not, don’t be afraid to repeat the wet swab cleaning process, but use a new swab.
Your sensor is now perfectly clean. Well done!
Conclusion
Provided you stick to the method described here and use proper wet swabs explicitly manufactured for sensor cleaning, you will not damage your camera. It is not a complicated process, but I do understand why you may find it daunting the first time you clean your camera sensor using swabs.
You will save yourself a lot of time and unnecessary expense by not having to rely on a professional sensor cleaning service.


Leave A Comment