
This is a simple trick to save you a lot of time when importing photos into Lightroom. This technique will show you how to apply develop settings to photos as you import them into Lightroom. Firstly, let me explain what the terminology here means.
What Are Develop Settings in Lightroom?
Develop settings in Lightroom refer to all the adjustments that you would normally make to your photos. Theses adjustments are usually carried out inside the Develop module. The adjustments you apply within the Develop module are carefully and individually applied to each image to ensure it looks its best. Each photo demands a series of adjustments that are unique. So why would anyone want to carry out adjustments during the Import process? After all, adjustments carried out during the Import process will be identical on all images. Adjustments that are not unique to each image will never look right, right? Well, yes and no. Let me explain.
Firstly, it is not uncommon for photographers to import a series of photographs and have a generic black and white adjustment applied to them all during the import process. Yes, this generic adjustment will never result in every image looking its best and further adjustments within the Develop module will most certainly be needed. But the repetitive task of converting each to black and white has already been done.
Secondly, there are some adjustments that can be applied to images during import that can be unique to each photo. One such example can be found in the Lens Correction tab of the Develop module.
Lens Corrections.
Since version 3, Lightroom has had the ability to automatically correct a variety of lens distortion issues. The settings within the Lens Corrections tab are able to:
- Remove chromatic aberrations;
- Correct for individual lens distortions.
Lightroom contains a large database of lens profiles which it uses to apply corrections. These corrections are applied automatically and are designed to compensate for distortions that are unique to each lens. The cool thing about these lens corrections is they are unique to different lenses. Lightroom can automatically analyse the metadata for each photo before applying the correct profile and adjustments for every single photo. And, it can do all this as part of a batch adjustment or as a preset during the import process.
The photo below shows the difference applying lens corrections can make.


Not only does the lens correction straighten the bow in the vertical and horizontal lines, it also removes the darkening in the corners of the image.
This is why I always apply lens corrections to every single image I import into Lightroom. I can think of no reason why I would ever want to omit this from a photo that I was editing in the Develop module. Having Lightroom apply lens corrections for me as it imports my images, saves me the time and boredom of the repetitive task. It also ensures that I never forget.
Apply Develop Setting to Photos During Import.
This is where the simplicity of this complex task makes this tip so wonderful. To have Lightroom apply lens corrections during import:
Step 1 – Select any image and open it in the Develop module.
Step 2 – Ensure no other adjustments are applied by clicking on the Reset button found at the bottom of the develop settings.
![]()
Step 3 – In the Lens Corrections tab, check Remove Chromatic Aberration and Enable Profile Corrections.

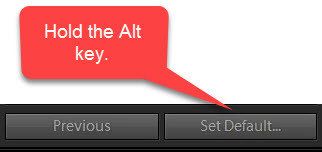
Step 4 – Now, hold the Alt key and notice the Reset button changes to Set Default… Click on Set Default.
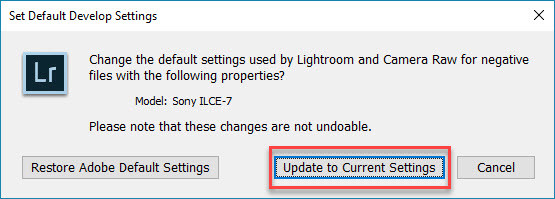
Step 5 – Choose Update to Current Settings. You’re done!
Now when Lightroom imports a photo from that specific camera model, it will apply the lens corrections automatically to match whichever lens was on the camera at the time.
Conclusion
I cannot think of any reason why you wouldn’t want to apply lens corrections to each and every photo that you import. So, why not set up Lightroom to do it for you as it imports.
The only time this won’t work is when you took a shot with a lens that didn’t have the electrical contacts that send the information to the camera. Without these connections, your camera can’t record the lens information in the metadata of the image. In this instance, you will need to apply the lens corrections manually.
Please feel free to comment and let me know your thoughts.


Great tip! I was looking for this in several books but you had it. Is there anyway to bulk change the lens corrections settings after they were imported? Or do I have to just re-import them.
Thanks,
Mark,
There are a couple of ways to perform this. The quickest method may work just fine. If not, I’ll write a post describing the longer but certain method.
The easy method is to highlight all the images you want to apply lens correction to and ensure Auto Sync is switched on. Now click the check box next to lens correction. Lightroom will read the metadata for each image and apply the appropriate lens profile.
Let me know if this works.
Martin.
I can think of at least one reason why you wouldn’t want to apply a lens corrections to each and every photo you import, and that is when your workflow comprises initial optimization of your raw files using DxO PureRaw which already applies demosaicing, denoising, and lens defect correction to your raw images.