

Yes, you’ve read it correctly, download our free Lightroom Presets immediately. You can download them and add them to your copy of Adobe Lightroom right now. They will work with all versions of Lightroom from version 5 up to Lightroom CC.
How do I install the free Lightroom Presets?
Each of the Preset packs comes with full instructions on how to install them into your copy of Lightroom. The instructions are detailed and cover both Windows and Mac operating systems.
If you are using an up-to-date version of Lightroom CC, installation is very simple.
- Extract the zip file you have just downloaded and make a note of the location of the files;
- Navigate to the Develop module in Lightroom;
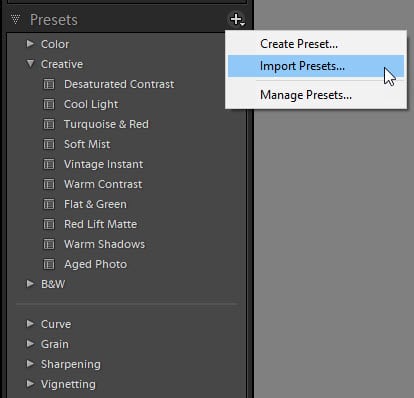
- On the left-hand side of the screen, you’ll see a Presets tab. Open this Presets tab and click on the small + icon;
- Select, Import Presets;
- Navigate to your the location of the extracted Preset pack you wish to add to Lightroom;
- Select all the Preset files and click Import. You’ll now see all the Presets under User Presets category.
What are Lightroom Presets?
Our free Lightroom Presets will allow you to quickly and consistently apply edits to your photographs in Lightroom. The Presets are built to add pre-defined adjustments with one click. They are a fantastic way to save you a lot of time and they will ensure you have a consistent look across a series of images.
My advice is to use a Preset to get you close to the look you want, then tweak the sliders in the Basic panel to get the exposure correct. You can apply a preset to a bunch of selected images at once. It’s a real time-saving trick.
Download the free Lightroom Presets now
To download all our free Lightroom Presets, click on the Shop link in the menu above and pick the Presets you want.
Enjoy
Enjoyed using our free Lightroom Presets? Please let us know and share this page with others.


Leave A Comment